Welcome SkyTechs
Welcome SkyTechs
Welcome SkyTechs
Skyline Security
Welcome SkyTechs
Skyline Installation Procedures
Download
Tech Line (562) 270-9453
When you call Skyline regarding a customer, they will ask for a Lead#, this is listed on the customer’s page as Account ID.
Pre-Work
Arriving to the Home
-
Send text to customer with ETA (estimated time of arrival). Use approved template.
-
“This is (NAME) with Skyline Security. I am excited to install your Smart Home System for you today. Just letting you know that I will be arriving in/at approximately (time to arrival).”
-
Note: On same days the rep will be providing this information to the customer based on the ETA you give in GroupMe
-
-
Park in the street whenever possible. If street parking is not an option, be sure to ask the customer’s permission to park in their driveway.
-
Grab essentials from vehicle
-
Bring your tool bag and panel with you to the door.
-
Introduction and Expectations
-
Knock on the door, take a step back, and introduce yourself and show your badge to the customer to assure them that you are with Skyline.
-
“Hello, Mr./Mrs. (Name)? I am (Your Name) with Skyline Security. I’ll be your Installation Professional today.”
-
-
Ask politely to enter the home to review account details and get started.
-
“Do you mind if I come in, so that I can review the equipment with you and get you and your family protected?”
-
-
Ask customer if they would like you to wear shoe covers.
-
Build some rapport with the customer
-
Take note of landscaping, vehicle, new-home, sports teams, etc. and build some common ground with the customer. For example: "Mrs. Jones, the landscaping in your yard is really nice. It looks like you guys have put a lot of work into it." (**Link to customer greeting VIDEO**)
-
-
Conduct walkthrough with customer while reviewing package details.
-
Review and take note of any existing equipment in the home.
-
Verify if the existing system was active or at least “is on”
-
Note: If an existing system is not being monitored, let the customer know that you can, “try and utilize the existing equipment, but that you cannot guarantee its functionality.”
-
-
Review products purchased and any previously discussed locations for the products. (Note: On same day accounts the sales rep may do the walkthrough with you)
-
Give professional recommendations on best locations for panel and sensors.
-
For example: DO NOT ask “where would you like your panel?”, instead say, “the panel requires access to a power outlet, and we also want the panel to be centrally located so that the 2-way communication will be audible throughout the home. What would you think about somewhere around here?” (and show them a couple options). **Link to Professional Recommendations videos**
-
-
-
Return to your car to gather all the equipment to be installed.
-
Review equipment order to ensure you have everything. If you are missing anything, reach out to your Lead tech or Regional to see if another tech nearby has the part.
-
-
Place Yard Sign in front of the customer’s home and give stickers to customer.
-
Create an appropriate workstation near the location of the panel to reduce amount of clean-up in the home.
Work
*All product installations must be done to Skyline Standards*
Introduction and Expectations
-
Mount Panel
-
Mount Panel **(Link to Install Video)**
-
-
Unpackage and Organize equipment
-
Unbox all sensors and equipment
-
Keep all trash contained in your work area
-
Lay out equipment in order of programming and installation
-
-
Connect Panel to Customer's WiFi network
Programming
-
Z-wave equipment
-
Follow individual product Standards
-
Add all devices within 2’ of panel. You will rediscover the network once they are all installed.
-
-
Existing Sensors (if any)
-
Verify functionality of existing equipment, and alert customer of any that need to be replaced (if applicable)
-
Replace batteries of all existing equipment
-
-
New Sensors
-
Follow individual product standards
-
Enter Zone Info into Orion and click SAVE
-
**(Link to Programming Videos)**
Register Cell Unit
*Link to Tutorial on Skyline U
-
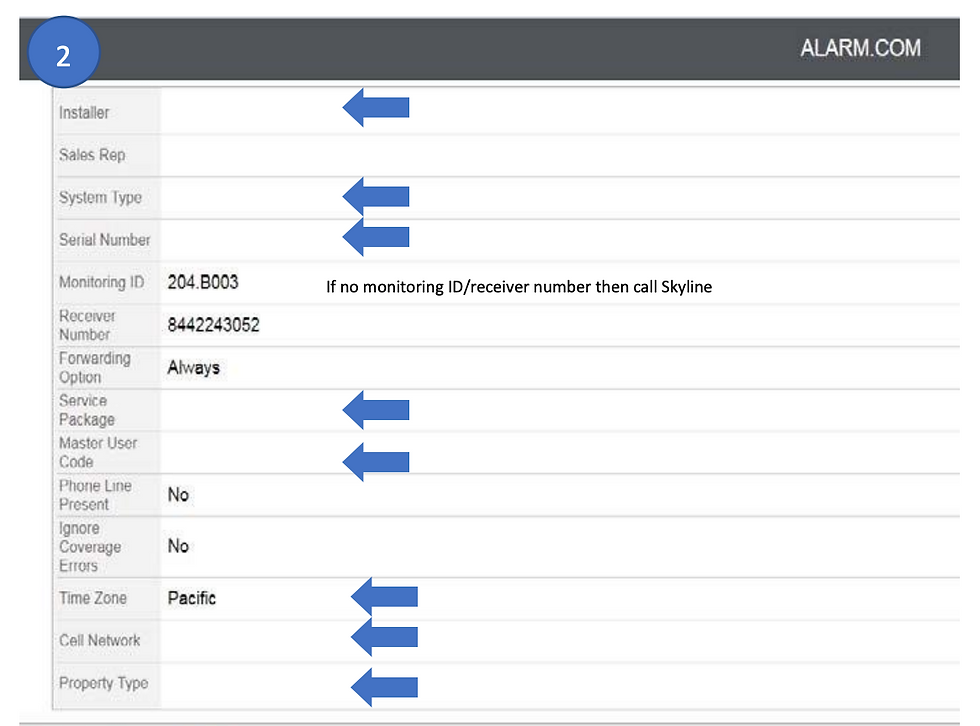
Click on Alarm.com tab in Orion
-
Fill out information on the form (Installer, SystemType, etc.)
-
Installer (your login name)
-
System type (panel type)
-
Serial Number (cell radio #)
-
Service Package – set to Interactive
-
Master User Code – set to 1234
-
Time Zone – set to your appropriate location
-
Cell Network – usually Verizon, but select appropriate carrier
-
Property Type – typically Single Family or Business
-
-
Add any Additional Services
-
Pro Video with Analytics – for up to 4 indoor and/or outdoor cameras b. Pro Video Plus – for more than 4 cameras
-
Basic Doorbell Camera – installing 1 Skybell
-
Doorbell Cam & Pro Video – if you have a Skybell and a camera
-
Image Sensor Plus
-
Z Wave Lights – Smart Lights (Bulbs, Dimmers, Plug-Ins)
-
Z Wave Thermostat
-
Z Wave Locks
-
LiftMaster Integration – Garage Door Controllers
-
-
Click on Create Alarm.com account
-
After a few moments, alarm.com info will be populated
-
-
Screenshot the Login information at the top of the screen to use later


Input Equipment Zones
*Link to tutorial on Skyline U
Do this while the cell unit is registering, and panel is rebooting
-
1. Click on Equipment Zones Tab in Orion
-
ID – this is the zone #
-
Type – What type of sensor (i.e. door, window, glassbreak, etc.)
-
Event Code – reporting type (i.e. burglary, fire, medical, etc.)
-
Location – where is the sensor (kitchen, living room, etc.)
-
Comments – if you need to be more specific about zone location (i.e. multiple windows in the same room)
-
-
Click on Save Zones
-
Note: if you leave the page without saving, you will have to start over.
-


Product Installation
*Link to product videos
-
Install all security sensors
-
Follow all individual product standards
-
-
Install Z-wave devices
-
Follow all individual product standards
-
-
Install cameras
-
Help customer setup their Alarm.com account and download the Alarm.com mobile app
-
Start camera configuration process in Alarm.com
-
For Skybell – Install Videos
-
For ODCs – Install videos
-
For Stationary cameras – Install videos
-
-
Utilize Airport Utility App to verify if camera location (0 - -60 dbm is acceptable) will work without interference. Go to potential camera location and look for the dbm to the router.
-
Install cameras to individual product standards
-
Run wire while cameras are configuring
-
-
Testing/Sending Signals
*Link to Tutorial on Skyline U
-
Test system with devices installed in proper locations
-
Send signals from all sensors, panics, and duress
-
Arm the system
-
Trigger every zone
-
Press each panel panic
-
Disarm system with the Duress Code - 2580
-
-
Verify all signals went through via “Event History” tab on Orion
-
Alternatively, you can call Brinks to verify a full set went through.
-
Note: If a signal is missing you must resend it.
-
-
-
Conduct 2-way test
-
Select 2-way test on Orion
-
Wait about 1 minute, then send Medical panic signal from the panel.
-
Follow operator instructions.
-
Write down confirmation #.
-
-
Run ADC system check via MobileTech
Post-Work
Clean Up
-
Remove all packaging/trash from the customer’s home
-
Wipe down and sweep/vacuum any surfaces where you may have left dust/debris
-
Ensure all customer belongings (ie. Furniture) are placed back in original position.
NOTE: Do NOT ask if the customer wants you to clean up. Clean up proactively. 2. Setup customer’s Alarm.com app (on camera installs this will already be done)
Customer Training
-
Guide the customer in the use of their system at the alarm panel and devices (thermostat, door lock), on the Alarm.com website, and on their mobile app.
-
Help customer setup rules, scenes, notifications, schedules, and Geofencing in Alarm.com
-
Test each command with the customer to verify they understand how to use the system.
-
Inform customer of who to contact in case of concerns with the system. Give them user manual and ensure they have phone #s for Brinks and Skyline.
-
Encourage the customer to leave a positive review for us on Google via Podium app.
-
Link to video
-
2nd QA Call with Skyline
-
Call Skyline to conduct the 2nd QA and verification of Equipment Order while at Customer's House.
-
Note: This must be done while on-site WITH the customer
-
Pay close attention to the Equipment Order so that the correct parts are removed from your warehouse.
-
Load up Vehicle
-
Take all tools and extra equipment back to vehicle.
-
Say goodbye to customer and thank them for trusting Skyline to protect their home and family.
PLEASE NOTE - The above steps are all extremely important! As a Technician, you get paid for the account upon funding. Any errors or steps not taken on your part could hold up funding and your pay.